FAQ
1. How to send an encrypted email?
Email Encryption has been enabled for all College of Nursing workforce members (@health.fau.edu email addresses). Encrypted email is designed to enhance our security measures and protect our information systems, confidential, sensitive and personal data. All CoN workforce members may send encrypted emails to any recipient regardless of the recipient address (inside or outside of FAU).
Who does this apply to?
Faculty/Staff who are involved with clinical, research, financial, educational (includes student personal information under
FERPA
) or sensitive administrative activities that are protected by federal and private requirements (e.g.,
FERPA
,
HIPAA
) should encrypt their emails when sending such information.
In general, you should encrypt any email communications regarding Protected Health Information (PHI) that contain:
- A health status
- Provision of health care
- Payment for health care that can be linked to a specific individual
Likewise, any part of a patient's medical record or payment history must also be encrypted. Any message with sensitive content (such as an SSN, Driver's License, DEA #) that is going to an external address (e.g., hospitals or clinics) must be encrypted.
How does it work?
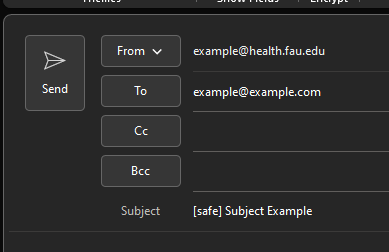
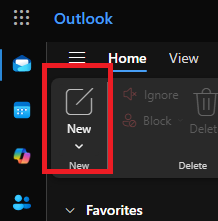
When creating a new email, simply insert "[safe]" in the subject line, without the quotes, as in the example below:
The recipient will receive an encrypted copy of that message and will be asked to sign in to unlock or decrypt the message to view its contents.
If you do not insert "[safe]" in the subject line, the email will not be encrypted and it will be treated as normal email.
Contact Jony Singh if you have any questions: jsingh@health.fau.edu
2. How to open an encryted email (external users)
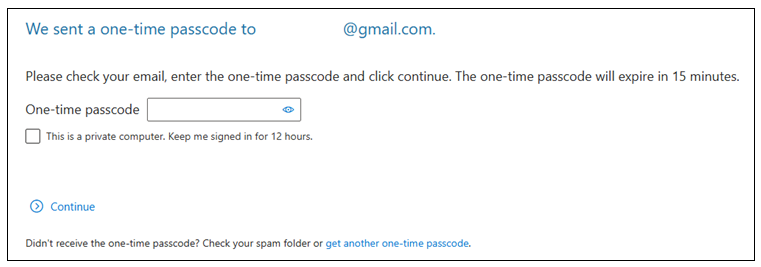
Below is step-by-step instructions on how to open an Encrypted or “Safe” email using a one-time passcode.
THE ONE-TIME PASSCODE EXPIRES IN 15 MINUTES AFTER IT HAS BEEN SENT!
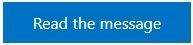
- Open your email and click on “Read the message” option.
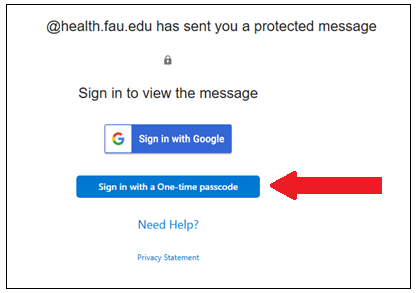
- A browser window [Google Chrome, Internet Explorer, or FireFox] will appear giving you two options.
- First option is to sign in with your account credentials
- Second option is to use the one-time passcode. Click the one-time passcode.
- After clicking on the one-time passcode option, another browser window will replace the previous window in step 2. This window will tell you that an email has been sent to your email address and will be asking for the one-time passcode.
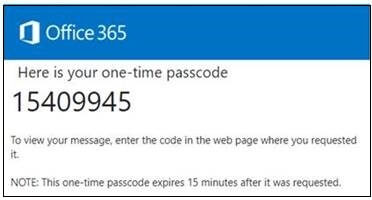
- You will have received another email with your one-time passcode, therefore go back and check your email.
- In that email you should see a passcode that looks like this:
Above is only an example!
- Use the code you received and enter it into the new browser window from step 3. and then click continue
- After you enter the one-time passcode you should be able to read the message within the email.

3. How to change reply all to reply in Outlook?
Below is step-by-step instructions on how to change the Default “Reply all” setting to “Reply”. These instructions only apply if you login into Outlook online through a web browser.
- Login on to Outlook through Google Chrome using the website outlook.fau.edu.
- Click on Settings in the top right hand corner
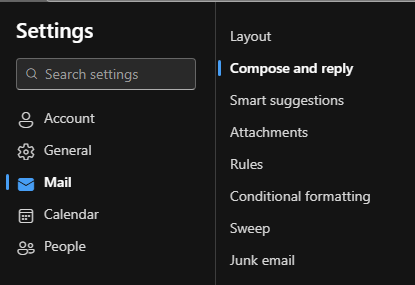
- Click on "Mail" and then "Compose and reply".
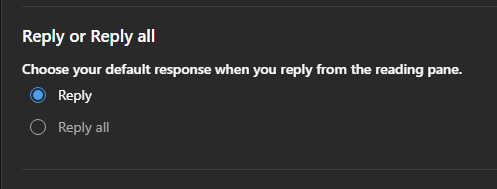
- Scroll down to the "Reply or Reply all" section and change to Reply.
- Exit the settings window.


4. How to enroll for HIPAA training?
To enroll for HIPAA training please follow the instructions on this page: HIPAA Training Instructions
5. What is phishing?
Phishing is the attempt to obtain sensitive information such as usernames, passwords, and credit card details (and money), often for malicious reasons, by disguising as a trustworthy entity in an electronic communication.
Phishing is typically carried out by email spoofing or instant messaging, and it often directs users to enter personal information at a fake website, the look and feel of which are identical to the legitimate one and the only difference is the URL of the website in concern. Below is an example that shows common red flags in an email which shows that it is phishing.
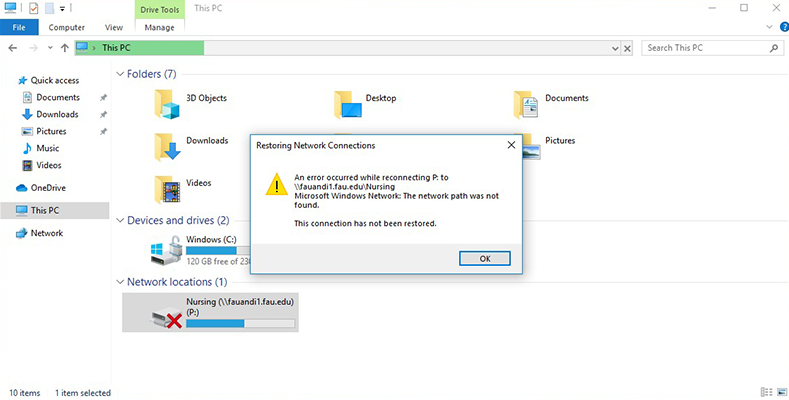
6. How to access FAU drives at home?
Below is step-by-step instructions on how to properly access FAU network drives from home. If you are getting the error message below or if your Nursing network drive has a red X
on it like the image below, please follow these instructions.
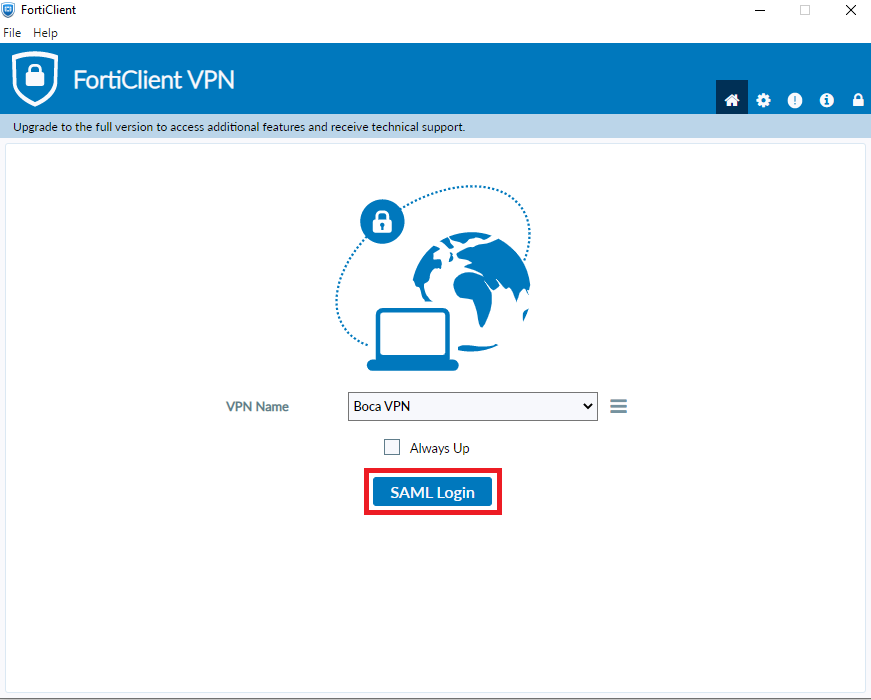
Connecting to FortiClient VPN
- Click the
SAML Login
button to start the login process. Please note that if Forticlient is not installed on your device, you will need to request IT help to have it installed.
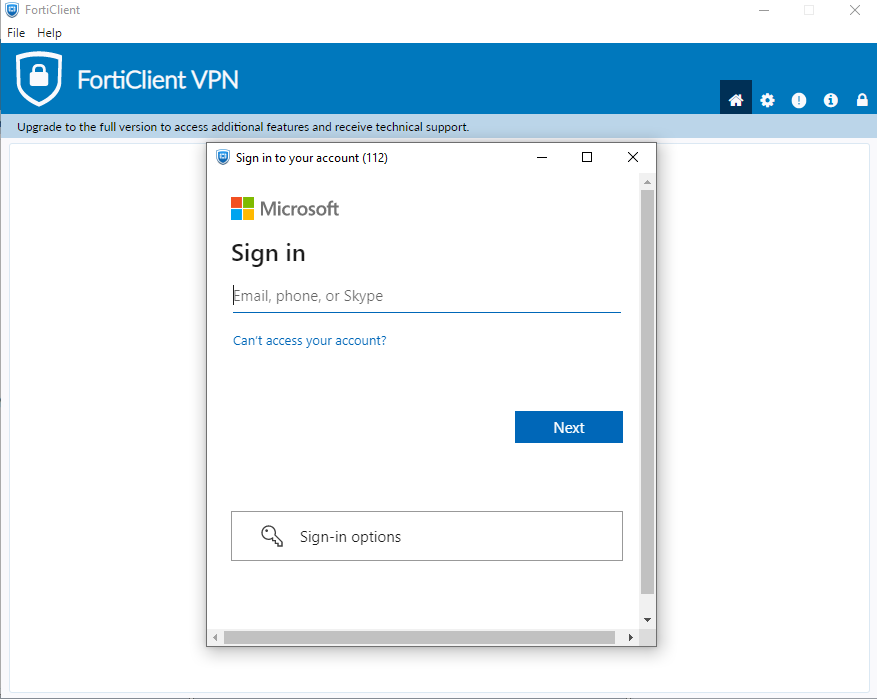
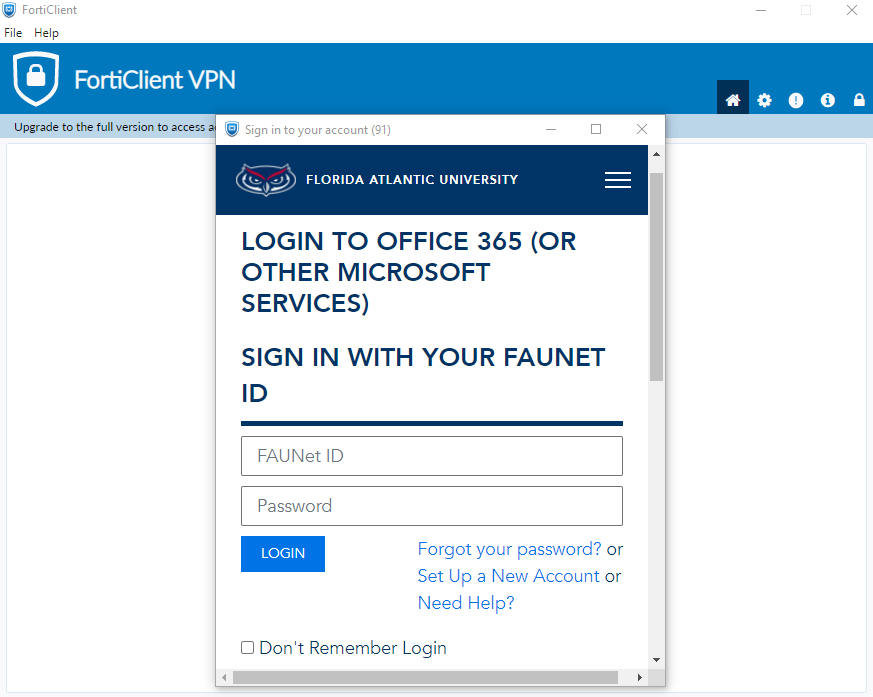
- After you press the
SAML Login
button, you will be prompted with a Microsoft login. Enter your username with your health account address, in which you will be prompted to do your full FAU login.
- After logging in through the FAU Portal, you will be asked to verify your information with DUO. FAU VPN requires you to be enrolled in DUO for security purposes.
- Once you are successfully logged in, you will be automatically connected with the VPN to FAU's network.
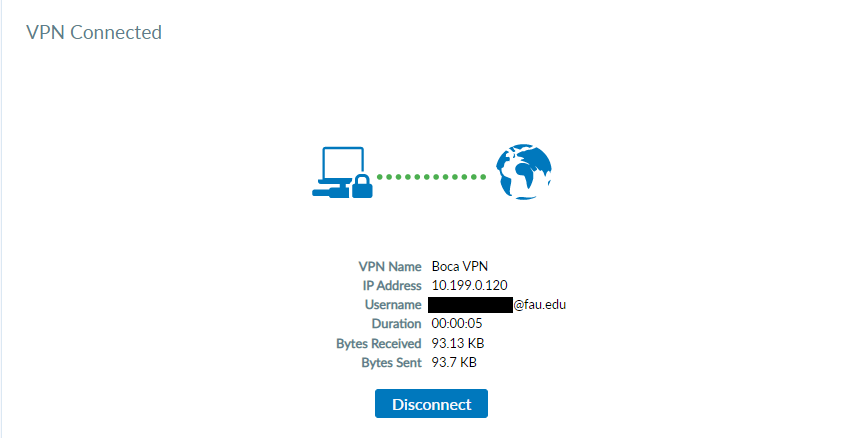
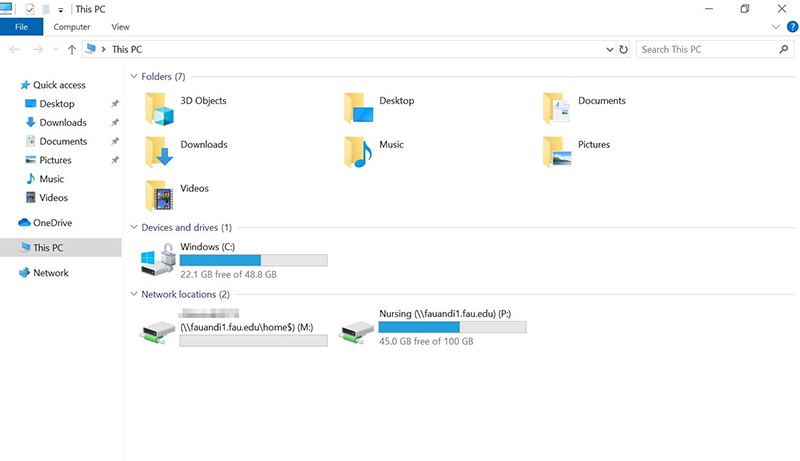
Connecting to Network Drives
- Once you have been connected to the FAU VPN connection using Forticlient, click on the
This PC
shortcut on your desktop.
- Once you have done this the Windows Explorer will open displaying the network locations you are able to access.

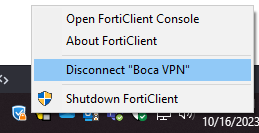
Disconnecting from Forticlient Using Task Bar
- In your task bar, right click the Forticlient icon.
- Once you have right clicked the icon, hover your mouse over
Disconnect Boca VPN
, then left click 'Disconnect'.

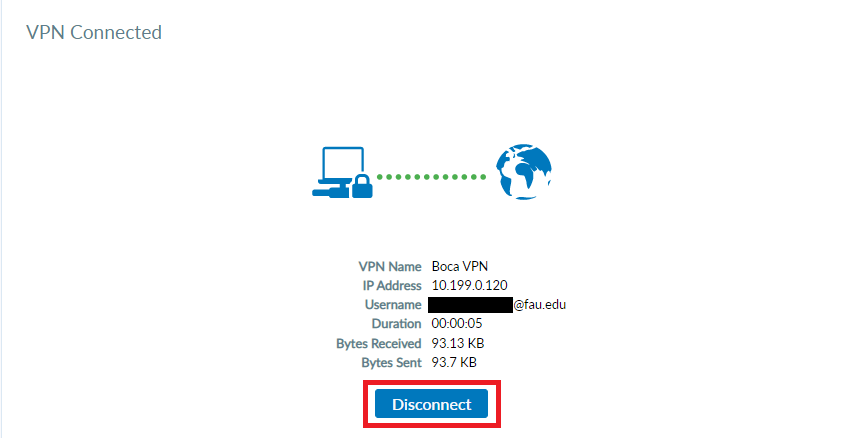
Disconnecting from Forticlient Using the Application
Once the application is open, left click the Disconnect
button to disconnect.
7. How to access email after migration to health email?
- You have received this email because you are scheduled to be transitioned into the new Office 365 platform. Your current FAU email will be migrated into the Microsoft Office 365 platform as a HIPAA compliance requirement. In addition to greater email storage space and HIPAA compliance, the transition to Office 365 service will provide you with many other benefits.
- Your new email address will end with “@health.fau.edu” instead of “@fau.edu.” People will still be able to reach you with the old email address; however, it is recommended that you start using “@health.fau.edu” in official correspondence.
- After the migration is completed, you will be able to check your email normally via Outlook or by visiting the website: http://outlook.fau.edu.
What is this new system?
What will change for me?
How will I check my FAU email on the web?
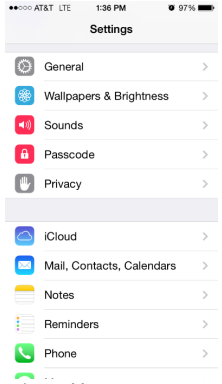
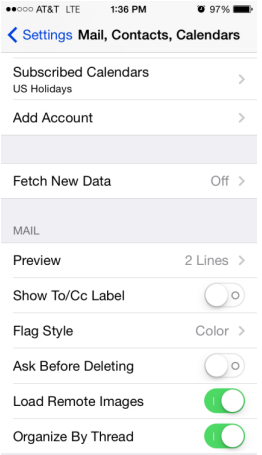
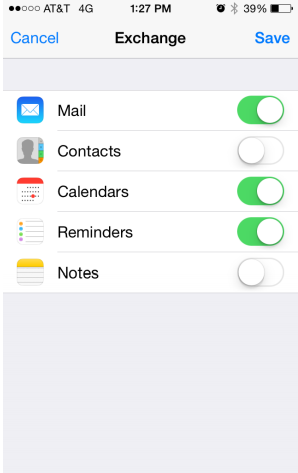
8. Office 365 iPhone/Android Email Configuration
- Launch Settings
- Click Mail, Contacts, Calendar
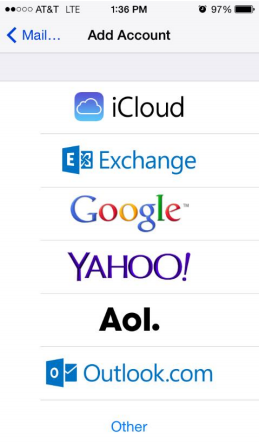
- Select Add Account
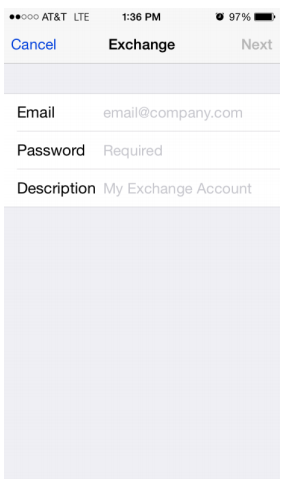
- Select Exchange
- Under Email put [ENTER YOUR FAUNetID HERE]@health.fau.edu
- a. Under Password enter your FAU Password which was set at myfau.fau.edu
- i. The initial default password is the three letters fau in lowercase followed by your date of birth in MMDDYY format (fauMMDDYY). Example, if your birth date is September 3rd, 1997, your initial password would be fau090397.
- b. Under Description enter,
FAU
- After settings have verified, select which items you would like to sync with FAU and click Save
Office 365 iPhone Email Configuration
- Select Apps on the home screen
- From the Apps list, select Settings
- Scroll down to the category Accounts and select Add account.
- Under the list of account types you can add, select Microsoft Exchange ActiveSync
- At the Add an Exchange ActiveSync account page
- a. Enter in your FAU email address (eg. FAUNetID@health.fau.edu) in the Email address field
- b. Enter your FAU password in the password field
- i. The initial default password is the three letters fau in lowercase followed by your date of birth in MMDDYY format (fauMMDDYY). Example, if your birth date is September 3rd, 1997, your initial password would be fau090397.
- c. Click Next
- In some cases it will not auto detect the server settings
- a. At the Setup could not finish message click Edit details
- b. Ensure your FAU email address is entered (eg. FAUNetID@health.fau.edu ) in the Email address field
- c. Under Domain\username enter in your FAU email address (eg. FAUNetID@health.fau.edu )
- d. Under Exchange server enter outlook.office365.com
- e. Select Next
- Under Activation click OK
- Under Remote security administration click OK
- At the Account options page click Next at the bottom of the page
- When prompted to Activate device administrator? Click Activate on the bottom
- Under Set up account click Next
- If prompted for Security update required, click OK
Office 365 Android Email Configuration
- Other Android
- Email Server: outlook.office365.com
- Email Address: FAUNetID@health.fau.edu
- Domain \ User: FAUNetID@health.fau.edu
- Password: FAU Password
- i. The initial default password is the three letters fau in lowercase followed by your date of birth in MMDDYY format (fauMMDDYY). Example, if your birth date is September 3rd, 1997, your initial password would be fau090397.
9. Setting Up Microsoft Outlook with Office 365 email for Windows
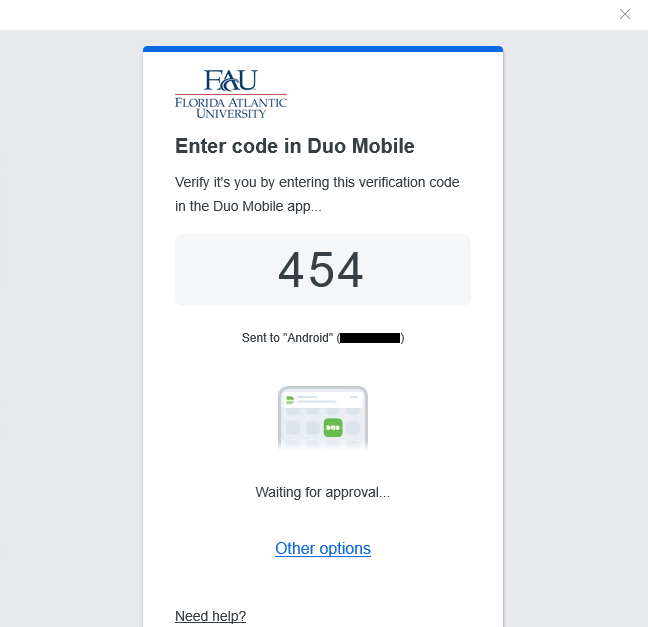
- When opening Outlook for the first time on the network, Outlook will automatically open with a FAU login prompt.
- After logging in, you will need to use your DUO authenticator to continue the login process.
- After authenticating with DUO Mobile, click
OK
, and leave the checkbox checked.
- At this point, you are logged into your Outlook account. You may go to
Account Settings
in theFile
tab to verify what account you are logged into.
- After this, your Outlook setup is complete. Your emails should start to come into your Outlook inbox.
If you are logged into a computer on FAU's network (domain), use the following instructions:
- Ensure you have an active internet connection.
- Open Outlook
- During the Microsoft sign-in, login as you normally would onto your account including the
@health.fau.edu
address. - A screen will popup
Windows Security
- Enter your information in the FAU SSO
- Click Login
- DUO Mobile with open with a authenticator code.
- Enter the code on your mobile device.
- After this, a successful login should be prompted.
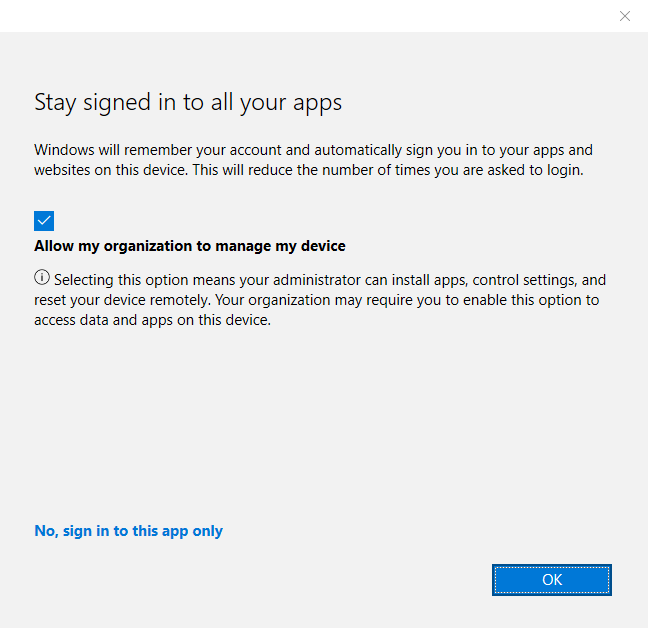
- At home or outside of the university, be sure to uncheck
Allow my organization to manage my device
. - Outlook setup is complete. Your email should start to come into your Outlook inbox.
If you are not logged into FAU's network (domain), use the following:
10. How to add a new device on DUO mobile?
Please watch the video below:
11. How to add a departmental account in Outlook?
How to add a departmental account in NEW Outlook (Desktop App)
How to add a departmental account in Outlook Classic (Desktop App)
How to add a departmental account in Outlook (Browser)
12. How to use REDcap's e-Consent Framework and send an Email Confirmation with a copy of it
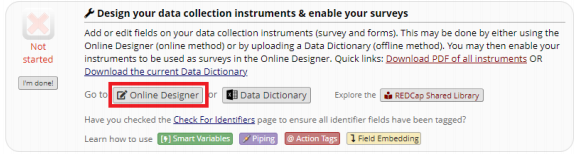
- After creating your consent form in REDCap, please follow the below steps.
- In your REDCap Project, be sure to have enabled the project to have surveys.

- Go to the Online Designer and enable the project as a survey.

- After enabling surveys in the project, scroll down to the PDF Auto-Archiver section and enabled
Auto-Archiver + e-Consent Framework
.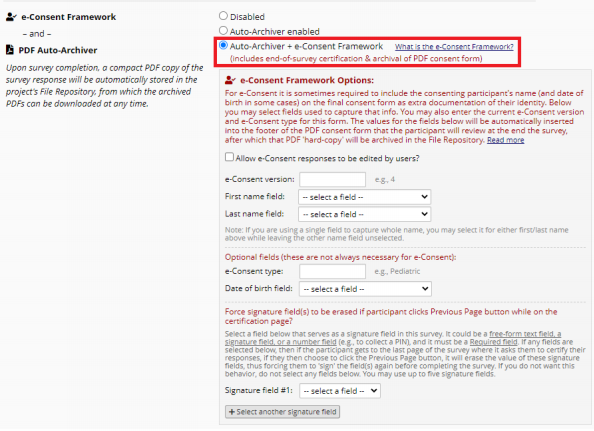
-
e-Consent Framework Options:
- e-Consent Version - Allows participants to keep track of which version of consent form. The number must be updated manually.
- First Name Field - Select the variable where the participant's first name is recorded.
- Last Name Field - Select the variable where the participant's last name is recorded.
- e-Consent Type - Allow you to categorize the type of consent form. [Optional]
- Date of Birth Field - Select the variable where the participant's date of birth is recorded. [Optional]
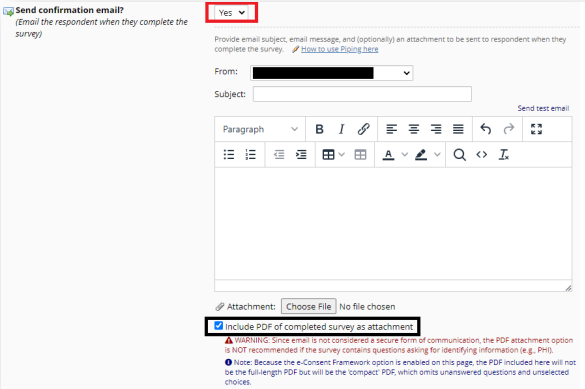
- To allow the participants to receive a copy of their consent form, ensure that
Send confirmation email (optional)?
is enabled andInclude PDF of completed survey as attachment
is checked. - With this enabled, at the end of the survey there will be an option for the participant to input their email to get an email copy of the consent form.
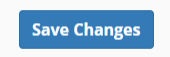
- After enabling those settings, be sure to click on
Save Changes
at the bottom
13. How to reset password in eCW
Please watch the following video:
14. How to send mass emails using the BCC field
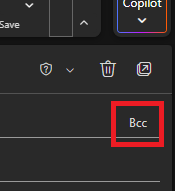
Please use Nursing email list addresses in Bcc field ONLY when sending out mass emails.
- Open a New Email using Outlook.
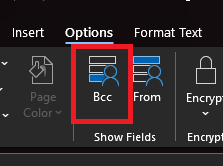
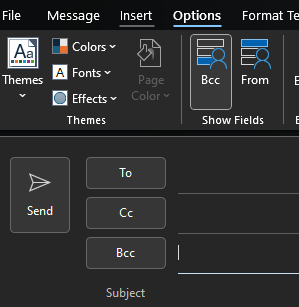
- A new message window appears. Click the Options tab, then click the Bcc icon from the ribbon
- In the BCC field, type the Nursing email list addresses.
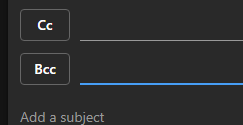
Using the Outlook Desktop App
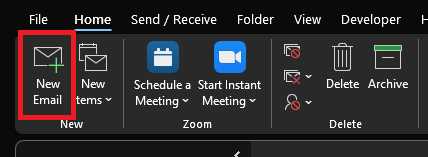
- Open a New Email using Outlook.
- A new message window appears. On upper right side of the new message, click Bcc.
- In the BCC field, type the Nursing email list addresses.
Using Outlook Web
15. How to protect my online surveys
- To enhance the security of your surveys and mitigate bot submissions, it is advisable to incorporate CAPTCHA. Please find below instructions on how to enable CAPTCHA for Qualtrics and REDCap surveys:
- In cases where a gift card is being offered, in the consent document, state that participants will be removed from the study without remuneration in cases of fraud and participants will not receive additional remuneration for completing the study more than once.
- Use the survey invitation features for both Qualtrics and REDCap instead of using a public link.
- Prescreen participants via video call.
- Use targeted advertising instead of posting in general social media platforms.
- Limit visibility of study-related social media profiles to audiences in the target geographic regions.
- Add mandatory open-ended questions in the survey with a minimum character limit.
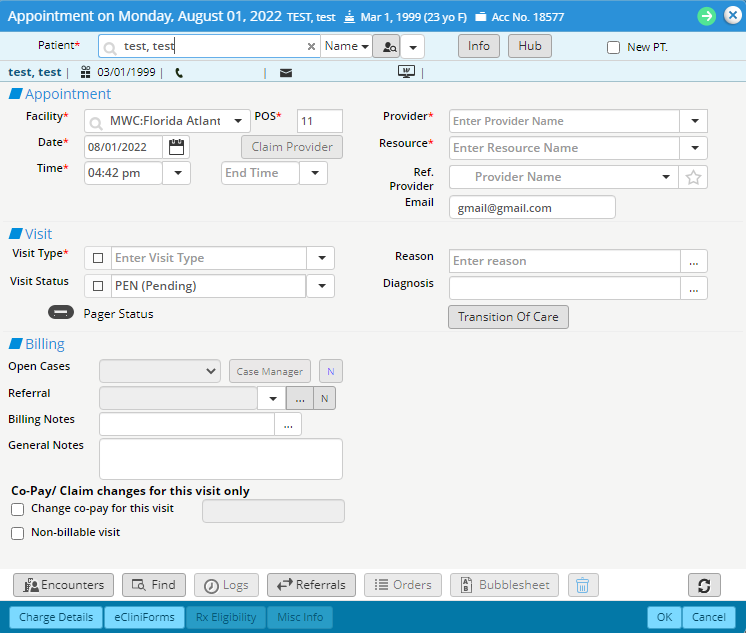
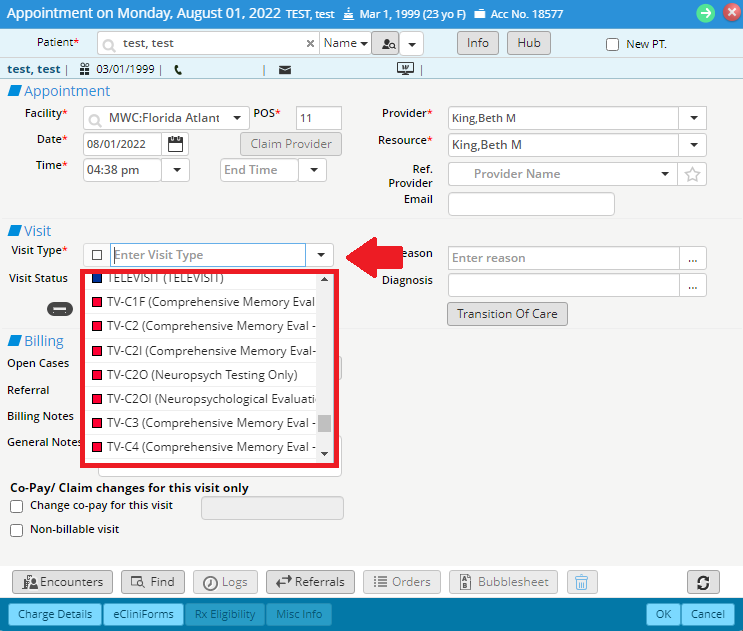
16. How to schedule Televisit/WebEx Appointments
- Create the appointment and select the patient
- Assign a Provider and Resource then for Visit Type please choose the corresponding visit types:
- Televisit (Healow)
- TV-C1
- TV-C2
- TV-C3
- TV-PT
- TV-PYSCH-I
- TV-PYSCH-F
- WebEx
- TV-C1x
- TV-C2x
- TV-C3x
- TV-PTx
- TV-PYS-Ix
- TV-PYS-Fx
- Televisit (Healow)
- Fill out the rest of the appointment information as normally and click “Ok”
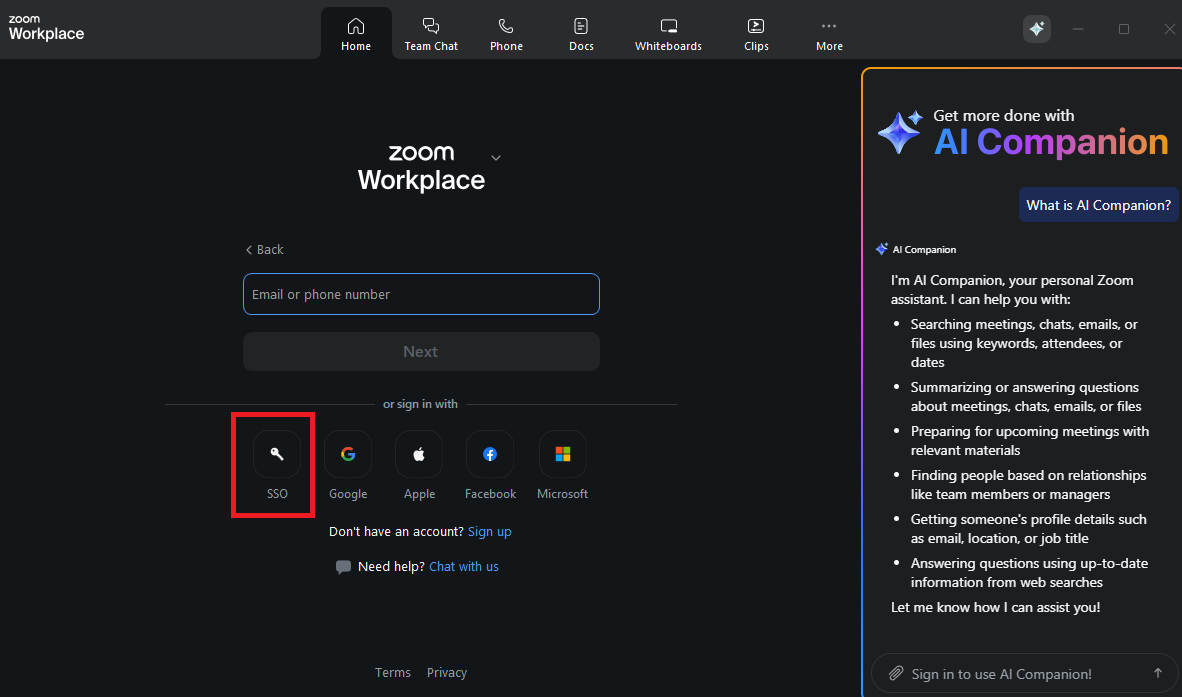
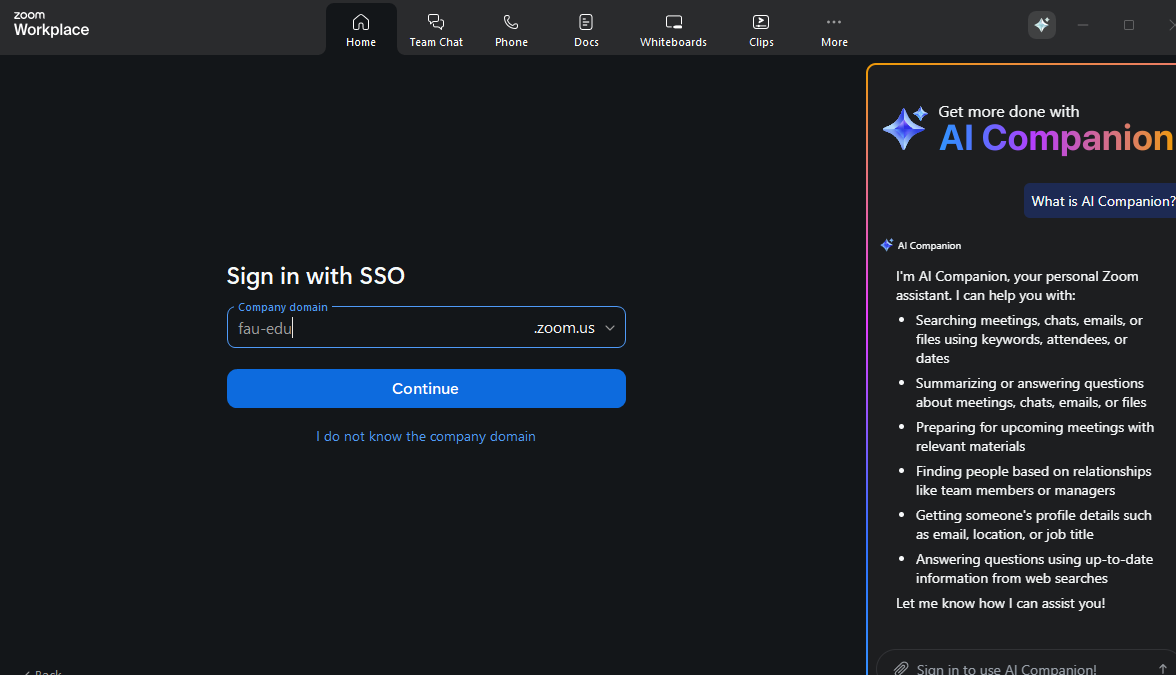
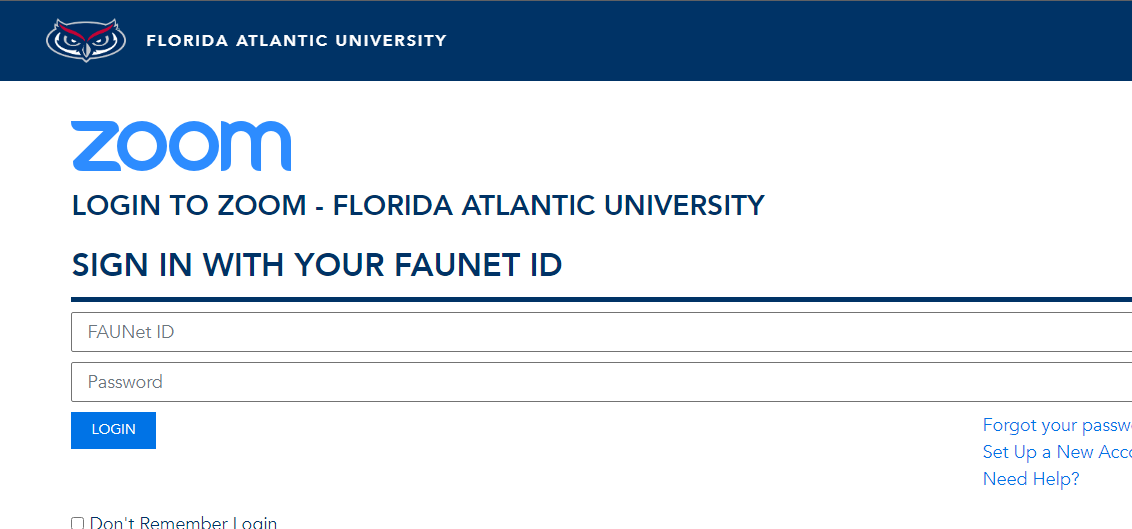
17. How to sign into Zoom
- Launch Zoom on your device
- Click or tap on SSO as circled below
- Enter ‘fau-edu’ for the company domain and click continue
- Your browser will open, enter you NetID and Password, then click login.
- If you see a pop-up to ‘always allow fau-edu.zoom.us to open links of this type in the associated app’, check the box and click ‘Open Zoom Meetings’.
- You will now be logged into Zoom.

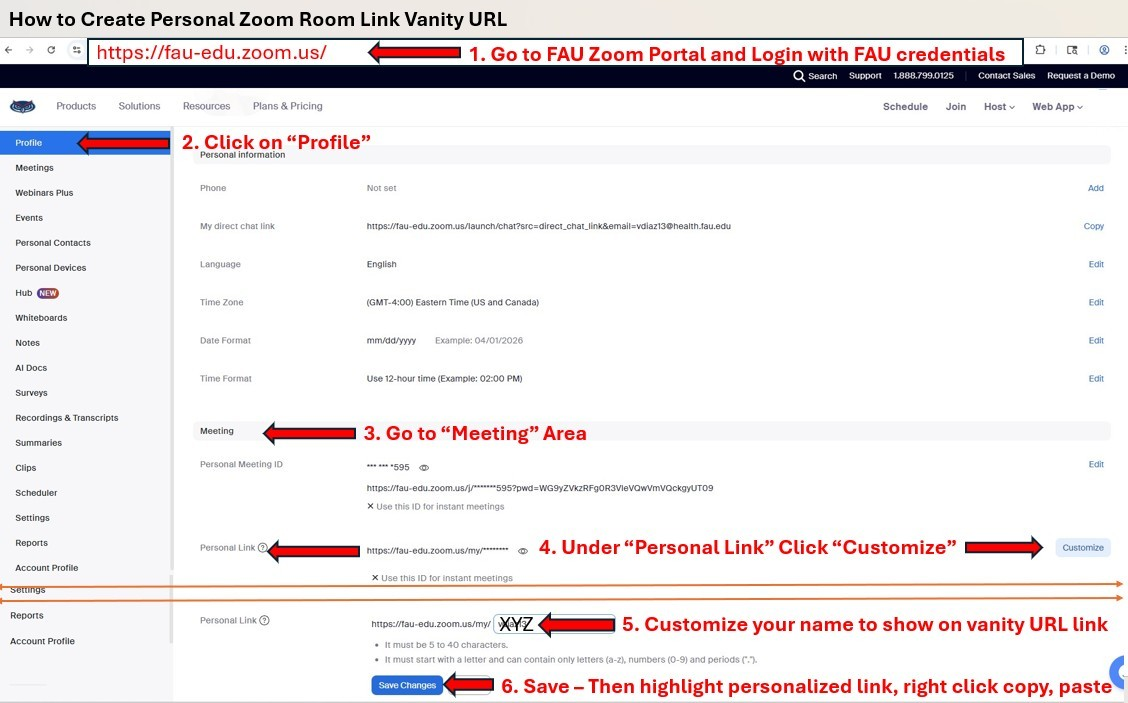
18. What is a Zoom Personal Meeting Room?
Your Zoom Personal Meeting Room is a permanent, always-accessible virtual space attached to your Zoom account. It uses a fixed Personal Meeting ID (PMI) and can be customized with a unique URL, making it ideal for impromptu calls, office hours, and recurring check-ins with colleagues and students.
When to Use a Personal Zoom Link
- Impromptu Meetings & Quick Catchups: Perfect for spontaneous, one-on-one drop-in chats without the hassle of generating a brand-new meeting link each time.
- Office Hours & Consultations: Great for instructors, academic advisors and other staff members who want a permanent virtual "door" that students or colleagues can bookmark and return to.
- Virtual Business Card: Because you can customize the URL to something like zoom.us/my/YourName, it’s easy to include in email signatures or messaging apps.
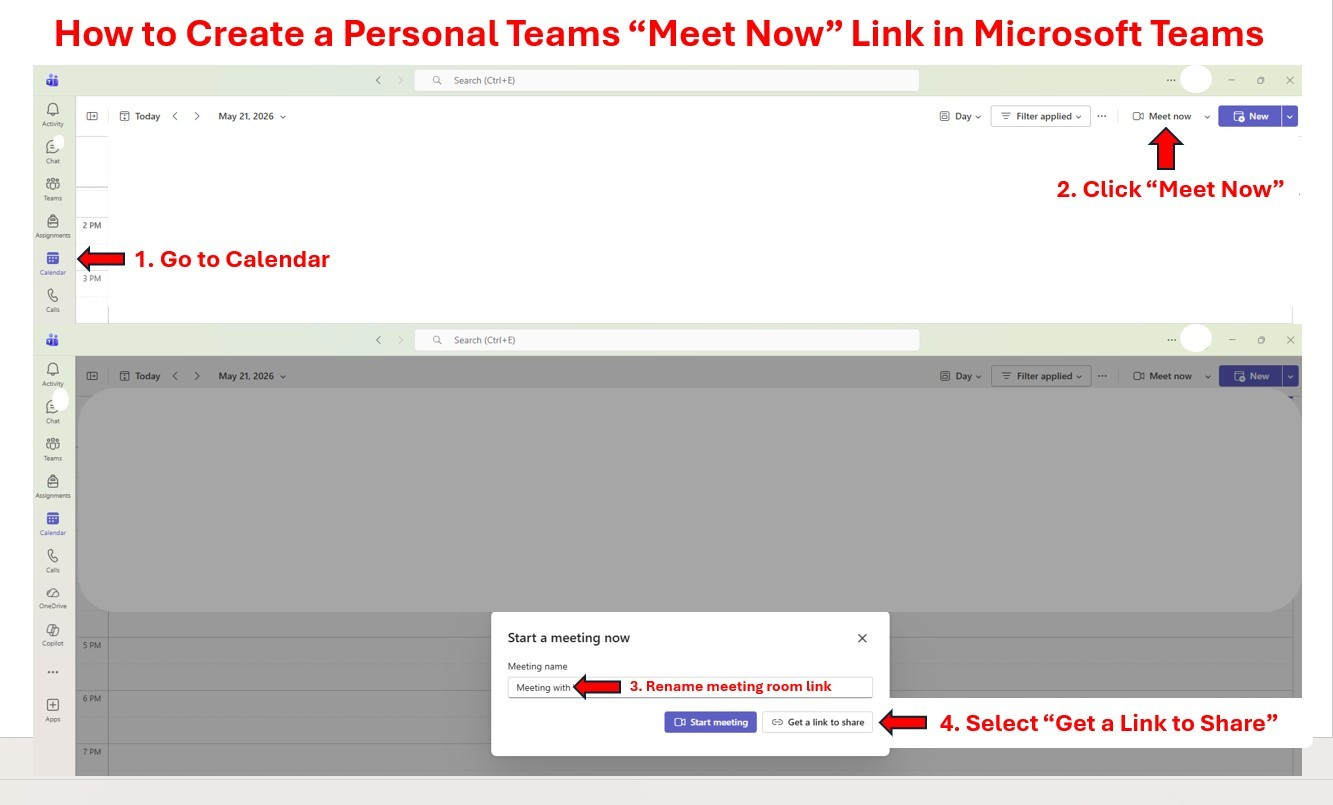
19. Does Microsoft Teams Have a Personal Meeting Room like Zoom?
Microsoft Teams does not have a dedicated, single static ID feature like Zoom's Personal Meeting Room. However, you can easily replicate the same functionality using the "Meet Now" link.
The "Meet Now" Method
This is the closest direct equivalent to launching an instant Zoom room.
- Open Microsoft Teams and go to the Calendar tab.
- Click the Meet Now button in the top right corner.
- Click on Meeting Name to Rename the meeting room, such as "[Your Name]'s Room").
- Select Get a link to share (you can also Copy the URL). This link is permanent and never expires, meaning you can reuse it for any drop-in meetings.